Advanced Non-Destructive Testing

Advanced Non-Destructive Testing
A) Eddy Current Testing (ET)
Eddy Current inspection is one of several NDT methods that use the principle of electromagnetism as the basis for conducting examinations. Several other methods such as remote field testing (RFT), flux leakage and Barkhausen noise also use this principle.
Eddy currents are created through a process called electromagnetic induction. When alternating current is applied to the conductor, such as copper wire, a magnetic field develops in and around the conductor. This magnetic field expands as the alternating current rises to maximum and collapses as the current is reduced to zero. If another electrical conductor is brought into close proximity with this changing magnetic field, current will be induced in this second conductor. Eddy currents are induced electrical currents that flow in a circular path. They get their name from Eddies, which are formed when a liquid or gas flows in a circular path around obstacles when conditions are right. ID probes, which are also referred to as Bobbin probes or feed-through probes, are inserted into hollow products, such as pipes, to inspect from the inside out. ID probes have a housing that keep the probe centered in the product and the orientation of the coil(s) somewhat constant relative to the test surface. The coils are most commonly wound around the circumference of the probe so that the probe inspects an area around the entire circumference of the test object in one go.
B) Magnetic Flux Leakage (MFL)
Magnetic flux leakage methods provide asset owners with the information required to assess tank- life suitability. Magnetic flux leakage methods work by inducing a strong magnetic field, near saturation, within ferrous materials. When an area affected by corrosion or metallurgical change is traversed by the sensor head, a change in flux density is measured and depicted on a digital computer screen, alerting the operator in real time while also being recorded for post-analysis.
C) Thermographic Testing.
Infrared thermography detects radiated thermal energies emitted from objects. With thermal imaging, the visible range of the wavelength spectrum is increased, allowing us to view and measure radiated energy. Infrared cameras are non-contact devices which can produce single images or even videos. Heat sensed by the instrument can be precisely quantified and measured, not only allowing thermal performance to be monitored, but also the identification of problem areas.
D) Acoustic Emission
Acoustic emission is a technique that is being used increasingly in the field of structural integrity assessment using fracture mechanics.
The dynamic behavior of defects is extremely important as a small defect that is growing may well be more significant than a larger stable defect. Acoustic emission is the method used to investigate the behavior of defects under stress. The test structure is subjected to a stress (usually slightly greater than the normal maximum load) by mechanical, pressure or thermal means. Under these conditions crack growth, local yielding and corrosion product fracture may occur resulting in a sudden release of energy, part of which will be converted to elastic waves. These elastic waves are readily detected by piezoelectric transducers which, by using methods of triangulation, can give positional information about the emitting defect. The amplitude of the received signals can also be used to give an indication of the rate of growth of the defect. Acoustic emission is a very sensitive test method and one transducer can adequately monitor a large area or structure. It is vital that there is a degree of confidence (resulting from experience) in the method as the test is dynamic and cannot be verified by repetition.
E) Advanced Ultrasonic.
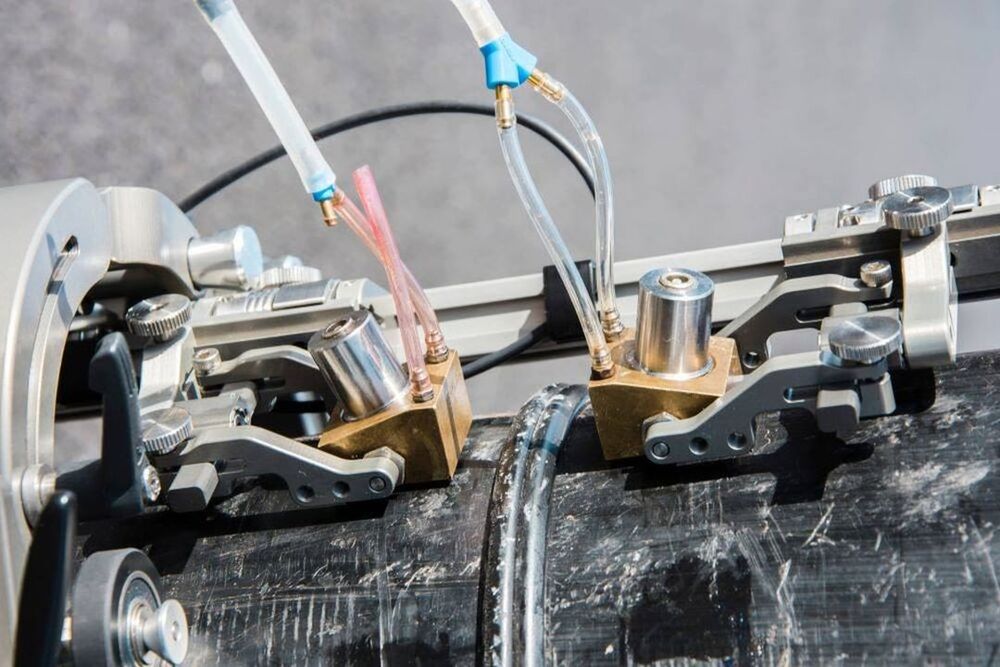
There have been many developments and refinements to the fundamental ultrasonic technique to cater for improved performance and/or results. For example, AUT refers to Automated Ultrasonic Testing. Although this is a generic term which relates to the computerized collection of ultrasonic data, the three-letter acronym AUT is now used to refer specifically to the automated ultrasonic inspection of pipe girth welds. Such systems have two sets of ultrasonic probes scanned circumferentially on either side of the weld. The sets of probes are selected to provide coverage of specific zones of the weld and the fusion face.
1) PHASED ARRAY ULTRASONIC TESTING (PAUT)
Ultrasonic Phased Array is used to detect component failures such as cracks and flaws and can be applied for inspection of welds, thickness measurements, corrosion inspection and flaw detection.
Phased array ultrasonic systems utilize multi-element probes, which are individually excited under electronic control. The PAUT probe consists of many small ultrasonic transducers, each of which can be pulsed independently and by exciting each element in a controlled manner, a focused beam of ultrasound can be generated.
The beam of ultrasound can be steered electronically and can be swept like a searchlight through the metal or object being examined. In this way two- and three-dimensional views can be generated showing the sizes and locations of any flaws detected in a "slice" view through the object.
Because the beam angle and focus can be controlled and manipulated this method is very efficient in terms of speed and flaw detection.
Phased array provides; high speed electronic scanning without moving parts, improved inspection capabilities through software control of beam characteristics and inspection with multiple angles with a single electronically controlled probe. Phased Array inspection experts are well trained and qualified in Phased Array inspections and operator capability is of key importance when utilizing this method.
2) Time of Flight Diffraction (TOFD)
The Time of Flight Diffraction (TOFD) technique is rapidly gaining importance as a stand-alone inspection technique. Time of Flight Diffraction is an advanced ultrasonic inspection technique that fulfils a need for trustworthy inspections. It is a powerful technique because it can simultaneously detect and size defects. TOFD inspection employs two longitudinal wave (L- wave) angle beam transducers arranged symmetrically opposite facing each other, dependable the weld or base material under test. One probe act like a transmitter of ultrasonic energy while the other probe receives the ultrasound energy. Time of Flight Diffraction is now routinely used in a wide range of applications such as inspection of piping and pressure vessels.
TOFD inspection experts are well trained and qualified in TOFD inspections and operator capability is of key importance when utilizing this method.
3) Long Range Ultrasonic Testing
Long Range Ultrasonic Testing is an advanced technology for detecting and analyzing corrosion where access is difficult.
* Benefits:
- Low cost screening with 100% coverage
- Focusing capability to evaluate corrosion distribution around pipe circumference Typical test range 60m from single location, ideal conditions can achieve longer distance.
- Testing of pipes up to 48” diameter
- Proven capability on pipe in service up to 125 Co
- Detection of metal loss > 3%
- Ideal where conventional testing is impossible or very costly
*Process:
- Low frequency ultrasound is transmitted and received from a single location
- The guided waves used travel long distances, even in entombed, submerged or insulated pipe
- Reponses from flaws is a function of their depth and circumferential extent Focusing allows ultrasound energy to be concentrated into a small region of pipe for detailed localized inspection
4) Short Range Ultrasonic testing (SRUT).
Short Range Ultrasonic testing also commonly known as SRUT is one of the Ultrasonic test methods where in the ultrasonic waves are transmitted in the form of pulsed guided laminar waves using special purpose ultrasonic probes. When laminar waves hit discontinuities, they are mode converted and the reflection of the waves are detected by the transducer.
Although Short Range Ultrasonic testing – SRUT is a screening technique used on wall thickness range of 6 to 25mm, this test method can locate the discontinuity location and size to an accuracy of ±10%. SRUT can detect discontinuities such as corrosion, pitting & erosion.
5) Internal Rotating Inspection System (IRIS Inspection)
IRIS is a technique that can be applied on both ferrous and non-ferrous materials and even on non-conductive materials like plastics. With IRIS the remaining wall thickness of tubes can be accurately measured. IRIS inspection is more accurate than other tube inspection techniques and has the advantages of presenting information about the geometry of defects. Local defects and wall-loss on both sides of the tube can be accurately measured. Defects under support plates can be measured without any limitations.
The probe used in IRIS examination is made up of a centering device, an ultrasound transducer and a rotating mirror. Knowing the sound velocity in the material under test enables accompanying wall thickness to be calculated. Water is then used to rotate the probe mirror and is also needed as a couplant between the transducer and the tube wall. A calibration standard of the same material and dimensions as the tubes to be examined is used to check the IRIS system response in preparation for the inspection and the tubes should be cleaned to an acceptable standard.
IRIS inspection experts are well trained and qualified in IRIS inspections and operator capability is of key importance when utilizing this method.
